Upgrading from UserSpice 3.x to 4.0
February 17, 2016Using the Database
February 14, 2018How Permission Levels Work
Note: This guide was created with screenshots from version 4.3.13, but the principles will most likely be the same regardless of the version all the way back to 4.0, but with less features.
The reason you started using UserSpice is probably because you wanted to be able to control who can access what. This article will tell you pretty much everything you need to know about how to control your page permissions.
If you go to the menu and click "Page Management" you'll see every single page that is located in the /, /users, and /usersc folders. You can learn how to add more folders here.
As of 4.3.13, the page looks like this.

You'll notice that every page has a unique "id" and it's clearly noted if the page is public or private.
Public means that someone can visit that page even if they're not logged in. Private means you have to be logged in. If you click on the blue text, you will be taken to the page that let's you adjust the permission levels required to access this page.
Now, I clicked on tomfoolery.php (which is the page that shows you when your users bump into security firewalls). 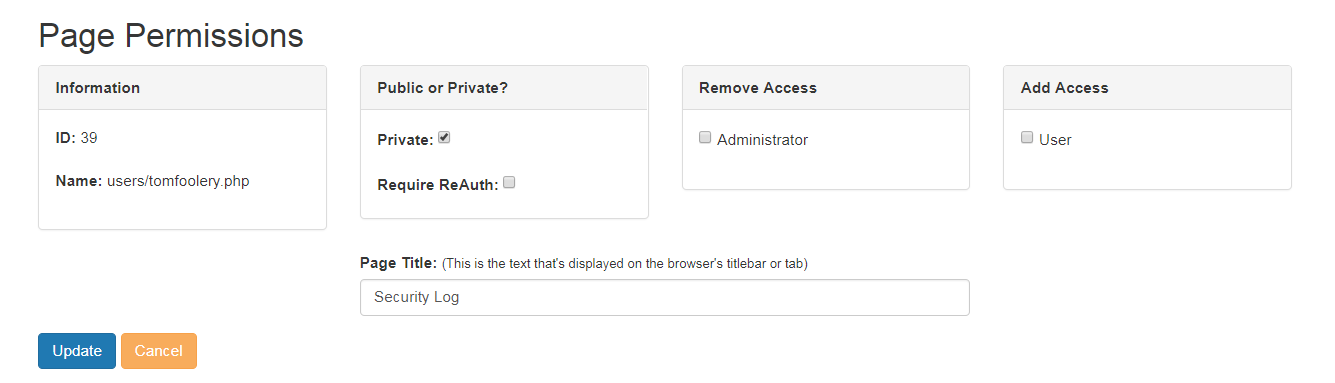
So, here you can turn uncheck private to make the page public to everyone. You can add access to the "User" permission group or you can remove access from the "Administrator" user group (which you probably wouldn't want to do either…but it's your project, so you can do whatever you want).
There's also a "Require ReAuth" box you can check that will ask for the user's password before allowing them to see this page if they've been logged in for a while. This is good for preventing people from accessing pages if the user has walked away from the keyboard.
That's one way you can manage permissions on a page-by-page basis. But there are other ways. We'll get to those in a few minutes. What if you want to create your own permission level. Let's do that.
Click on the menu and "Permission Levels." (The name has changed several times over the years). Simply type manager or something like that in the box and hit the "add permission" budget.
Now, you could go back to Page Management and click each individual page and add "manager" to every page you want the manager to be able to access, or you could just click the word "manager" on the page where you created the permission level. That will take you to a page like this…
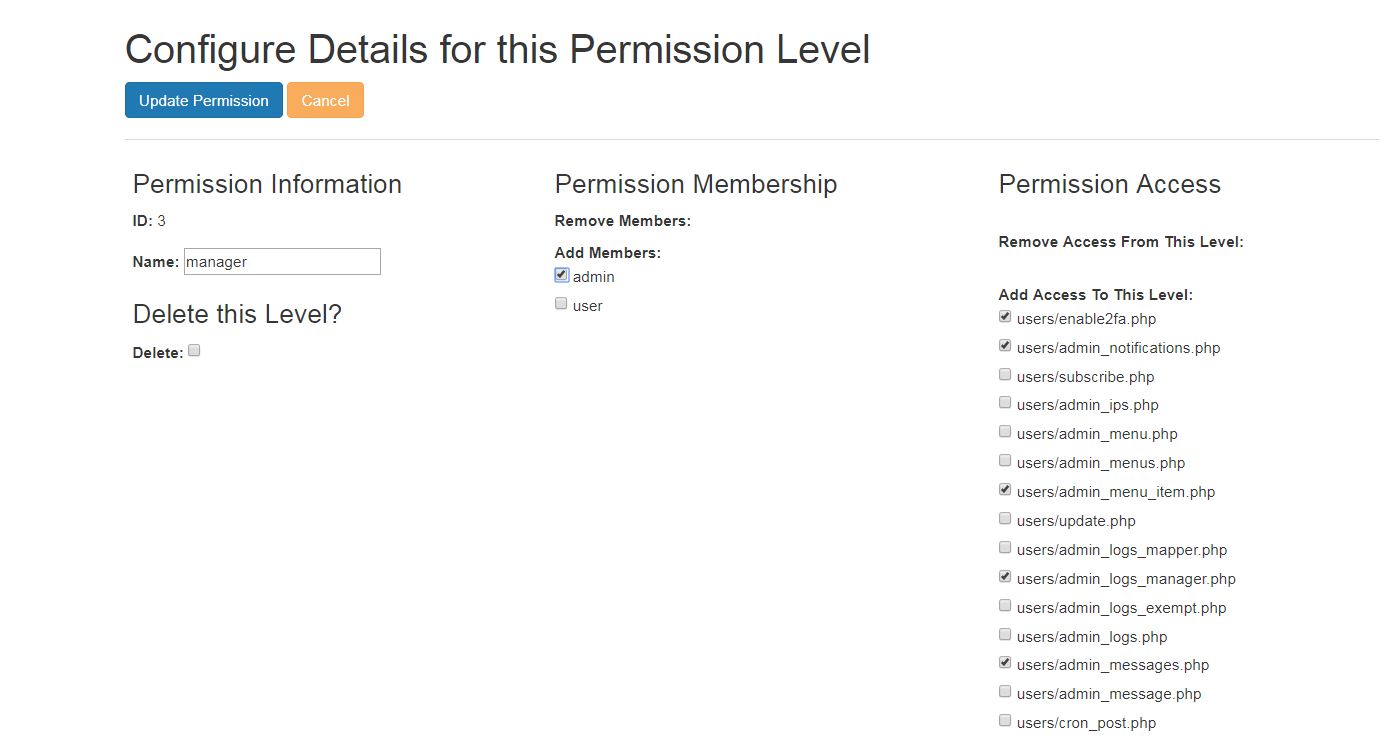
Here, you can do two things really quickly. You can check every user that you want to add to this permission level AND all the pages that you want to be accessible to this permission level. Click update and you're good to go.
Now we need to have a discussion about how the permissions really work.
- Permissions are not really "levels." In other words if you create 10 permission levels, 10 is not "more important" than 3 or vice-versa. Each permission level is its own thing. You have full control over who can access what.
- If a user has multiple permission levels, if ONE of those permission levels is allowed to visit a page, they can visit the page.
- Permission levels aren't just about accessing pages. You can use them in other cool ways like changing what people can do on a page.
<?php if(hasPerm([2],$user->data()->id)){ echo "You are an Administrator! Use your power responsibly!"; } ?> - There are two functions that let you do these sorts of security checks in the middle of the page. They're called hasPerm and checkMenu. They work really similarly. checkMenu was the original function from UserCake that only accepted one user level. You would use it like
<?php
//the 2 is the id of the permission level
//user->data()->id is how you get the user id of the logged in user
if(checkMenu(2,$user->data()->id)){
echo "You can see this";
}else{
echo "You missed something really cool";
}
hasPerm is exactly the same except it takes an array of permission levels
<?php
//notice the brackets because param 1 has to be an array!
if(hasPerm([2,3,4],$user->data()->id)){
echo "You can see this";
}else{
echo "You missed something really cool";
}
This is REALLY powerful stuff. For instance, I have a work order system. This type of coding allows anyone to submit a workorder, people with the "maintenance" permission to be able to see details of the work order but only a "maintenance supervisor" to be able to set the priorities and close the work order. Get creative!
So how does this all work in the database?
There are 3 important tables.
If you go to the "pages" table in the database, you'll see that every page is listed along with it's title that would show up in the browser bar, whether or not the page is private and whether or not the page requires re_authorization before visiting. Let's take a look at account.php and admin.php. Account is the main account page for every user. Admin is the main dashboard for administrators.
 You'll notice that the id of account.php is 3 and the id of admin.php is 4.
Ok, so keep that in the back of your mind while we go over to the permissions table.
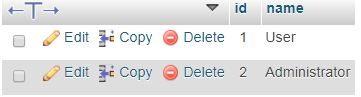
You'll notice that the permission level User has an id of 1 and Administrator has an id of 2. Believe me, I wish we would have done this the other way, but it's how UserCake did it and we started off as a derivative of that project. Anyway, it is what it is.
So you have 2 pages and 2 access levels. How does UserSpice decide if a permission level has permission to visit that page? Here is the table permission_page_matches sorted

So you have the page with the id of 3 (account.php) and it requires permission_id 1 (user) to access it. Then you have the page with the id 4 (admin.php) and it requires permission_id 2 (administrator) to visit it.
Let's take a look at one more quick example that's a little different. If you notice that page 42 (message.php) is in there twice

That's because you can send a message if you're an administrator OR a user. You only need to be one of them for that to work.
Let's say that you NEVER want your permissions to overlap. Maybe you're super organized and you want to make sure that a page can only be accessed by one user group. We've thought of that too. Go to the admin dashboard and on the main "site settings" tab, you can enable this setting.

Finally, we'll bring it home by showing you the user_permission_matches table.

You'll notice that user 2 (the default low permission userspice user with user/password) has permission id 1 "user." But user 1 (admin/password) has both permission level 1 ("user") and 2 ("administrator"). So every time you give a user a new permission level, it pops a new row in this db table with their user id and the permission you gave them. Then UserSpice works its magic behind the scenes to make sure everyone can see what they're allowed to see and ONLY what they're allowed to see.