Home / User Management
User Management
User Management
User Management is always the icing around UserSpice. Ultimately, you probably chose UserSpice because of its easy setup, booming configuration, and of course, the fact you can manage users. We have done our best to build an amazing User Management System that we are regularly evolving for your needs. This article is up to date as of UserSpice 4.3.14. There are two general techniques you will use to apply User Management. The built in, which is Administrators only, or a separate permission level (that of course you can title yourself, but will be referred to as "User Management" hereinout). My of course preferred method is a separate permission level, allowing people within your organization to assist in Managing Users, but only giving them so much access to your system. Even if you don't use it for this method, it keeps everything more segregated, but in a good way. However, it is totally up to you. The User Management Screen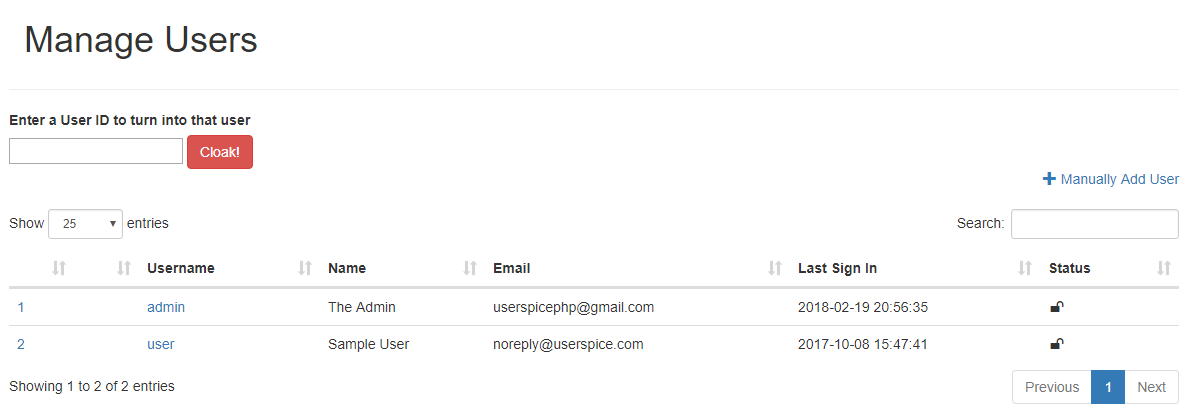 You will probably spend a lot of time in this section, so we'll go a bit in depth. The first thing you see is your cloaking ability (if of course you are within the master account array). This fancy feature, compliments of user gtilflm allows you to cloak into any of your users to see what it looks like from their view. This replaces your session data with theirs, but of course keeps the Cloaking Session information so you can cloak back. You can do this from the Account page, a big red button! If you cloak into a banned user, you won't be able to get back out, visit users/logout.php to terminate the session.
The next beautiful feature is the Manual Creation for accounts; this has come a long way since I joined UserSpice, and it is a nice modal, with very basic features. Depending on your Site Settings, the username field may or may not be there, and the password would be autofilled. The username setting is in Registration -> Auto Assign Usernames, and the Passwords can be auto-generated by the system in Site Settings -> Force Password Reset on Manual Creation. Doing this sends a link to your user with a "Set Password" label that they use to enable their account from forgot_password_reset.php. You may or may not send the email to the User (not-contingent on the Password Generator) by toggling the checkbox at the bottom of the form. That being said, be sure your Email Settings are properly setup and tested, as you don't want to bork your system! If you do not send the email, and you force password reset on manual creation, you will want to supply the password to the user so they can login to their account.
Following this we see the Users table powered by DataTables. This table can be quickly sorted by any attribute and by default sorts using the value in permissions (which is banned [0] or unbanned [1]) and then User ID. That way, if you have a bunch of banned users (which you use as an alternative to deleting), they won't be in the way when you load the table. There are a couple cool features you will want to note on this page, that you might not see. These are basically information icons. If the user is required to change their password on their next login, a red lock will appear in the column between ID and Username. If their account is banned (permissions=0) a black lock will appear in the very last column. This table also includes their name, email and last sign in. To access their profile for Management, click the hyperlinked User ID or Username.
The User Manager Screen
You will probably spend a lot of time in this section, so we'll go a bit in depth. The first thing you see is your cloaking ability (if of course you are within the master account array). This fancy feature, compliments of user gtilflm allows you to cloak into any of your users to see what it looks like from their view. This replaces your session data with theirs, but of course keeps the Cloaking Session information so you can cloak back. You can do this from the Account page, a big red button! If you cloak into a banned user, you won't be able to get back out, visit users/logout.php to terminate the session.
The next beautiful feature is the Manual Creation for accounts; this has come a long way since I joined UserSpice, and it is a nice modal, with very basic features. Depending on your Site Settings, the username field may or may not be there, and the password would be autofilled. The username setting is in Registration -> Auto Assign Usernames, and the Passwords can be auto-generated by the system in Site Settings -> Force Password Reset on Manual Creation. Doing this sends a link to your user with a "Set Password" label that they use to enable their account from forgot_password_reset.php. You may or may not send the email to the User (not-contingent on the Password Generator) by toggling the checkbox at the bottom of the form. That being said, be sure your Email Settings are properly setup and tested, as you don't want to bork your system! If you do not send the email, and you force password reset on manual creation, you will want to supply the password to the user so they can login to their account.
Following this we see the Users table powered by DataTables. This table can be quickly sorted by any attribute and by default sorts using the value in permissions (which is banned [0] or unbanned [1]) and then User ID. That way, if you have a bunch of banned users (which you use as an alternative to deleting), they won't be in the way when you load the table. There are a couple cool features you will want to note on this page, that you might not see. These are basically information icons. If the user is required to change their password on their next login, a red lock will appear in the column between ID and Username. If their account is banned (permissions=0) a black lock will appear in the very last column. This table also includes their name, email and last sign in. To access their profile for Management, click the hyperlinked User ID or Username.
The User Manager Screen
 This is a very powerful screen no matter what user you are looking at, as almost every value in that users row in the users table is displayed and can be modified. Lets begin with the Panel Heading bar. This will include the User ID, details about their Email Verified status (will not show if this is turned off in Email Settings) and a Protected Account checkbox. If their email is not verified and this setting is enabled, a checkbox will appear for you to change this value, otherwise it will have text indicating Email Verified (see below). This is a one way change, and requires a database query to reverse.
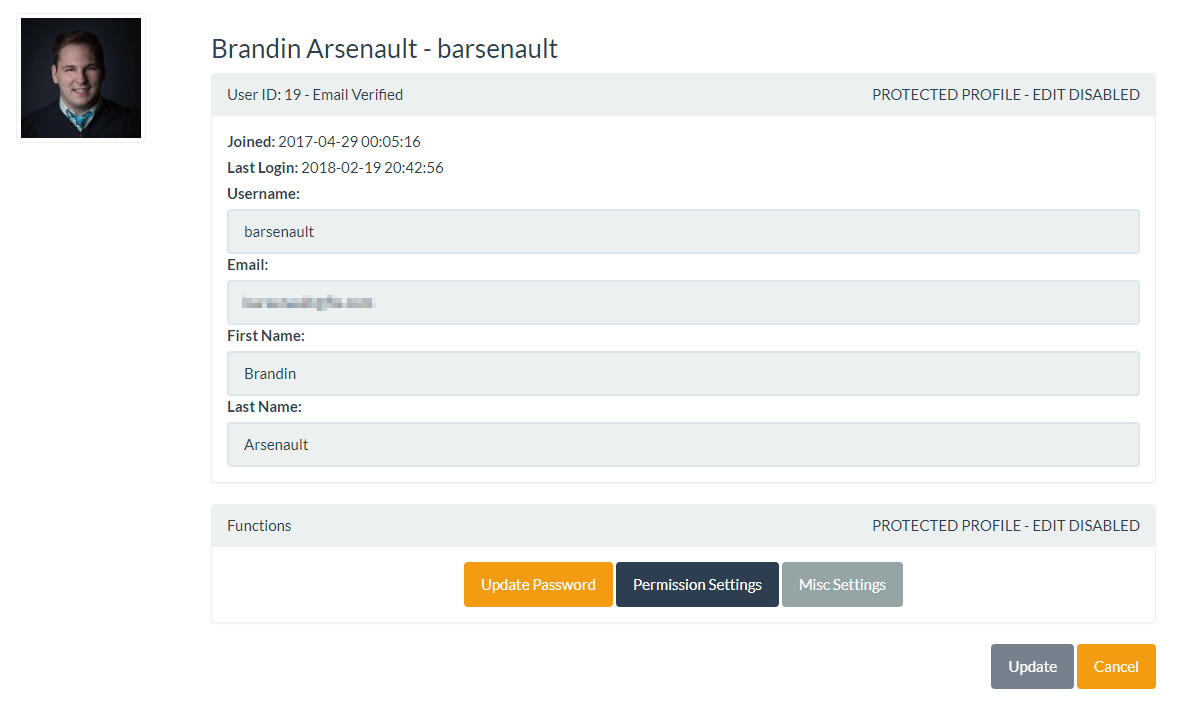 All form fields are disabled, and PHP validation will occur as well to be sure no back-hacking occurs. This goes for the modals as well, you will not be able to perform any actions in them. The Protected Profile box will only show for users within the master account array, as they are the only ones that should be able to assign this value.
Within the Update Password modal, you can change the user password and/or send a reset email (same as Forgot Password Reset email).
The Permissions Modal depends on your settings and how you perform User Management. If you have the Permissions Restrictions setting enabled, User Managers cannot assign or remove permissions that do not belong to them, and PHP validation is done on this as well. However, if this is disabled, permissions are a free-for-all, so a User Manager can add the Administrator permission level to themselves. Although this setting can be problematic, it can save your system too. Those in the Master Account array override this check and can always add or remove all permissions.
The Misc Settings modal allows you to exempt a user from messages, make them a "dev user" (this is un-used, but its there for you to use!), block their account, force a password reset, or delete the user. The primary account (1) cannot be deleted, and PHP validation will prevent this. You can easily fork your project by making this change manually-so just don't do it!
There is one more button that can show up on this page, and it only will if you create a file in usersc/includes called "admin_user_system_settings.php" (there is an example). This button will be called System Settings and will be positioned between the Update Password and Permission Settings button. Once this file is created, the button will show, and the modal will have whatever you put within this custom file.
All of the Update buttons in any modal will trigger updates for the whole form. If you make a change in the Forgot Password modal, and the permissions modal, the update button on either or the main splash screen will make all changes. Please remember this. The Cancel Button will return you to the Admin Users screen.
As always, if you have any questions, visit the UserSpice Forums or Discord Server!
All form fields are disabled, and PHP validation will occur as well to be sure no back-hacking occurs. This goes for the modals as well, you will not be able to perform any actions in them. The Protected Profile box will only show for users within the master account array, as they are the only ones that should be able to assign this value.
Within the Update Password modal, you can change the user password and/or send a reset email (same as Forgot Password Reset email).
The Permissions Modal depends on your settings and how you perform User Management. If you have the Permissions Restrictions setting enabled, User Managers cannot assign or remove permissions that do not belong to them, and PHP validation is done on this as well. However, if this is disabled, permissions are a free-for-all, so a User Manager can add the Administrator permission level to themselves. Although this setting can be problematic, it can save your system too. Those in the Master Account array override this check and can always add or remove all permissions.
The Misc Settings modal allows you to exempt a user from messages, make them a "dev user" (this is un-used, but its there for you to use!), block their account, force a password reset, or delete the user. The primary account (1) cannot be deleted, and PHP validation will prevent this. You can easily fork your project by making this change manually-so just don't do it!
There is one more button that can show up on this page, and it only will if you create a file in usersc/includes called "admin_user_system_settings.php" (there is an example). This button will be called System Settings and will be positioned between the Update Password and Permission Settings button. Once this file is created, the button will show, and the modal will have whatever you put within this custom file.
All of the Update buttons in any modal will trigger updates for the whole form. If you make a change in the Forgot Password modal, and the permissions modal, the update button on either or the main splash screen will make all changes. Please remember this. The Cancel Button will return you to the Admin Users screen.
As always, if you have any questions, visit the UserSpice Forums or Discord Server!