Using the Database
February 14, 2018Help create documentation!
February 19, 2018Using the Form Manager
We're pretty excited about this feature. UserSpice speeds up the development of PHP applications tremendously, but as I've found that I spend the bulk of my time building and processing forms. It's extremely repetitive. The UserSpice form builder aims to fix that.
Please NoteAs of UserSpice 5, the form builder is a plugin and not built in by default. Please get it through Spice Shaker
See also: Advanced Form Processing
Major Features
– The ability to create forms from scratch, generate them from existing db tables, or create views that are subsets of existing forms.
– The ability to automatically create tables of your form data.
– A form processor that can distinguish between inserts and updates.
– Built in validation and CSRF protection
Please Note
The form builder itself gives very powerful access to the database. It is designed to be used only by the site creator. As such, its use is restricted by default to users whose id's are in the master_account array in init.php. For security purposes, please do not open the form creator to end users. At most, add additional users to the master_account.
Creating a Form
More often than not, you will create a form using the traditional form builder. In the admin dashboard, simply click the plus on the form manager. Enter a unique name in all lowercase letters and you will immediately be taken to the form editor.

What happens when you create a form
In keeping with UserSpice's code readability and simplicity, 3 things happen when you create a form. Its name is stored in the us_forms table. A new table is created with the name you specified to store the data of the form. Finally, a new table is created with the name you specified and _form appended to the end. You might think that creating two tables for each form is a lot of overhead, but the power this gives you is pretty incredible. Not only does UserSpice now have the schema available to it easily and simply, but you have a lot of information about your form and data that you can use in all sorts of creative ways.
Creating Fields
After creating your form, you're redirected to the form editor. From there, you can add a virtually unlimited number of fields in your form. Each field will create a row in your _form table and a column in your data table automatically. On the left you will be able to begin to create these fields.
Field Type:
Let's you choose what type of field want in your field More coming soon!
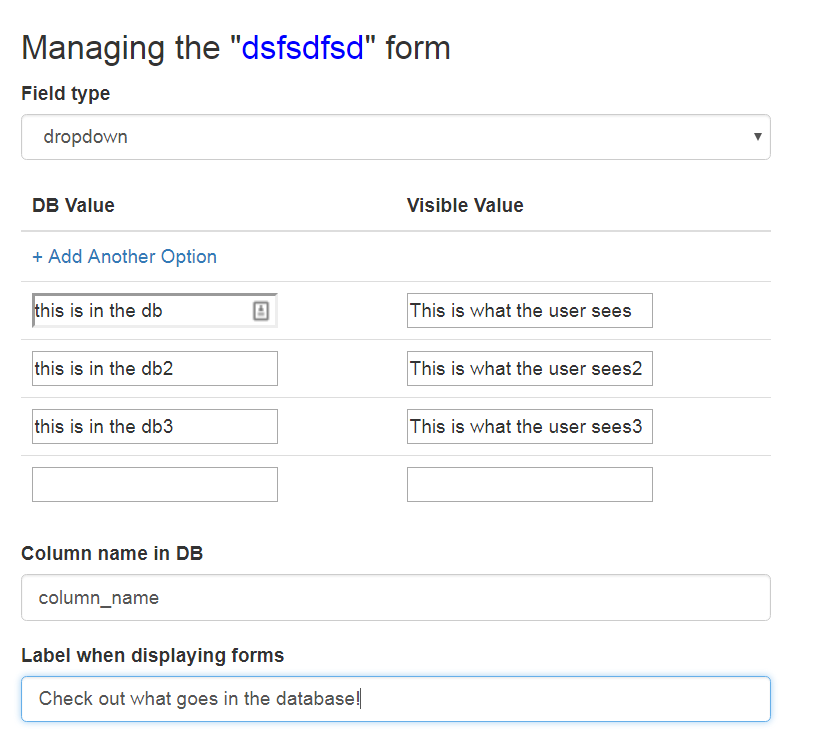
Options:
If you choose a field type that has multiple options, you will have the opportunity to enter the options here.
Column Name:
This is the column name that is used to be stored in the db. Usually you want this to be short, lowercase, and definitely unique. Make sure not to use any of the SQL reserved keywords or it will reject your field.
Label (Forms):
This is usually a little bit longer and it's the actual form label.
Label (Tables):
This is a shorter label that's used when displaying form info in tables. It's also used when a field fails validation. In other words, if you put First Name and they had to have a minimum of 2 characters, it will say "First Name must be at least 2 characters."
Required:
Self-explanatory.
Label (Forms):
The class of the form field itself. Defaults to form-control, but you can delete it or put something else there.
Raw HTML:
Perfect for doing custom HTML validation. You can put things like checked or step = ".01" in there.
Order:
What order will this form field show up on the form?
One more thing to note…
In order to keep things simple, most ints are created as int 11, most varchars are 255 and places where multiple options are selected are created as text columns for simplicity. If this bothers you, feel free to carefully edit the database to streamline it for your purposes.
Editing Forms
You can edit a form at any time. Please note that if you delete a field from the form, that field is NOT automatically deleted from the database. We care about your data. If you want to delete that column, you're more than welcome to, but we're not doing it for you.
You should also know that there are certain field options that cannot be edited after a field is created. You cannot change the "type" of field (from text to dropdown for example) from the UI. Please note that if you want, you CAN make this change in the database itself. This is another place where we are more concerned about your data than convenience. It's also a good idea to backup the database before messing with it.
Creating a form from a database table
Let's say that you have an existing db table and you want to make a form (or view/table) of it. You can click the little 3 bar icon at the top of the form manager. Select your table and a new form will automatically be created. This time it will only create the _form table and the entry into the us_forms table. We do our best guess at your database schema, but you'll probably want to take a look at the table to make sure everything looks right. Just as above, if we created a field as text, you can go into the _form table of the db and change it to dropdown if you want.
Views
Views are a great way to create a custom version of an existing form. Let's say you have a db table with 20 columns and you only want to display a table of 5 of them or have a form of 5 of them, click the little sunglasses icon at the top of the form manager. From there, you can check the fields that you want to include and create a custom view.
Displaying Forms
From the form manager, you will see a shortcode that will allow you to quickly display your form on any page in UserSpice. Forms are displayed with the form name. Views are displayed with the view number. The codes look like displayForm('dsfsdfsd'); or displayView(2);
Since the forms can be displayed anywhere on a page you can use regular CSS to control width, etc. You can drop them inside a "well" div or a "col-xs-3" or whatever you want.
Passing options when displaying a form
See also: Advanced Form Processing
You can pass an array of options when displaying a form.
$opts = [
'update'=>27, //the id of the row you want to update
'skip'=>'username', //do not display the field with the column name of username
'noclose'=>1, //do not close the form (so you can add additional fields manually)
];
Processing Forms
A form does not do you a whole lot of good if you can't submit it.
If you simply want to process the form and insert a new row in the database, all you have to do is put this on your page. PLEASE NOTE: The best place to put this is at the top of your page, just below the includes for the init.php and header. Do not put it below your form or the token security will fail every time.
if(!empty($_POST)){

processForm();

}
Easy peasy. Want to do something more advanced? Check out our Advanced Form Processing article.
Multi Language Support
Thanks to a great mod from UserSpice user Alexander, we have some basic multi language support on the form builder. For form labels, select options, checkbox, and radio options, simply replace the label with (LANG)language_key_here. So in other words, if you want to echo the current language for some reason, you would do (LANG)THIS_LANGUAGE and English or whatever language is active would show up there. Thanks Alexander!